 This is an abridged chapter from our book Core Data by Tutorials, which has been completely updated for Swift 4 and iOS 11. This tutorial is presented as part of our iOS 11 Launch Party — enjoy!
Welcome to Core Data! In this tutorial, you’ll write your very first Core Data app. You’ll see how easy it is to get started with all the resources provided in Xcode, from starter code templates to the Data Model editor.
You’re going to hit the ground running right from the start. By the end of the tutorial you’ll know how to:
- Model data using Xcode’s model editor
- Add new records to Core Data
- Fetch a set of records from Core Data
- Display the fetched records using a table view.
You’ll also get a sense of what Core Data is doing behind the scenes, and how you can interact with the various moving pieces.
Getting Started
Open Xcode and create a new iOS project based on the Single View App template. Name the app HitList and make sure Use Core Data is checked.
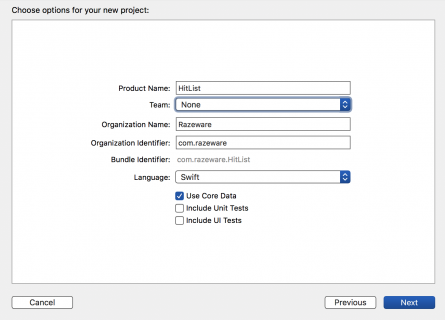
Checking the Use Core Data box will cause Xcode to generate boilerplate code for what’s known as an NSPersistentContainer in AppDelegate.swift.
The NSPersistentContainer consists of a set of objects that facilitate saving and retrieving information from Core Data. Inside this container is an object to manage the Core Data state as a whole, an object representing the Data Model, and so on.
The standard stack works well for most apps, but depending on your your app and its data requirements, you can customize the stack to be more efficient.
The idea for this sample app is simple: There will be a table view with a list of names for your very own “hit list”. You’ll be able to add names to this list and eventually, you’ll use Core Data to make sure the data is stored between sessions. We don’t condone violence in the book, so you can think of this app as a favorites list to keep track of your friends too, of course!
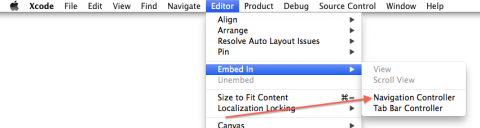
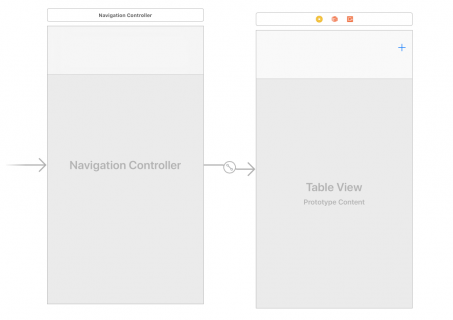
Click on Main.storyboard to open it in Interface Builder. Select the view controller on the canvas and embed it inside a navigation controller. From Xcode’s Editor menu, select Embed In…\ Navigation Controller.
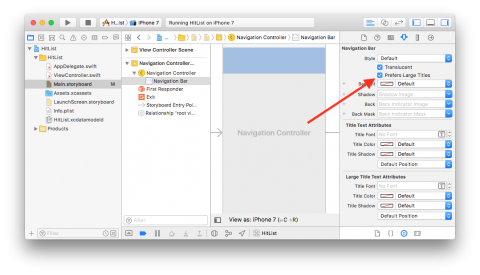
Click on the navigation controller’s navigation bar to select it, then click on Prefers Large Titles in the Attributes Inspector. This will give the sample app a fresh iOS 11 style.
Next, drag a Table View from the object library into the view controller, then resize it so it covers the entire view.
If not already open, use the icon located in the lower left corner of your canvas to open Interface Builder’s document outline.
Ctrl-drag from the Table View in the document outline to its parent view and select the Leading Space to Safe Area constraint:
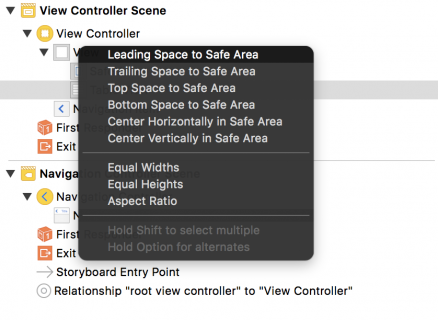
Do this three more times, selecting the constraints Trailing Space to Safe Area, Top Space to Safe Area and finally, Bottom Space to Safe Area. Adding those four constraints makes the table view fill its parent view.
Next, drag a Bar Button Item and place it on the view controller’s navigation bar. Finally, select the bar button item and change its system item to Add. Your canvas should look similar to the following screenshot:
Every time you tap the Add button, an alert controller containing a text field will appear. From there you’ll be able to type someone’s name into the text field. Tapping Save will save the name, dismiss the alert controller and refresh the table view, displaying all the names you’ve entered.
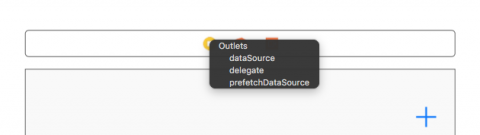
But first, you need to make the view controller the table view’s data source. In the canvas, Ctrl-drag from the table view to the yellow view controller icon above the navigation bar, as shown below, and click on dataSource:
In case you’re wondering, you don’t need to set up the table view’s delegate since tapping on the cells won’t trigger any action. It doesn’t get simpler than this!
Open the assistant editor by pressing Command-Option-Enter or by selecting the middle button on the Editor toolset on the Xcode bar. Delete the didReceiveMemoryWarning() method. Next, Ctrl-drag from the table view onto ViewController.swift, inside the class definition to create an IBOutlet.

Next, name the new IBOutlet property tableView, resulting in the following line:
@IBOutlet weak var tableView: UITableView!
Next, Ctrl-drag from the Add button into ViewController.swift just below your viewDidLoad() definition. This time, create an action instead of an outlet, naming the method addName, with a type UIBarButtonItem:
@IBAction func addName(_ sender: UIBarButtonItem) {

}
You can now refer to the table view and the bar button item’s action in code.
Next, you’ll set up the model for the table view. Add the following property to ViewController.swift below the tableView IBOutlet:
var names: [String] = []
names is a mutable array holding string values displayed by the table view. Next, replace the implementation of viewDidLoad() with the following:
override func viewDidLoad() {
  super.viewDidLoad()

  title = "The List"
  tableView.register(UITableViewCell.self,
                     forCellReuseIdentifier: "Cell")
}
This will set a title on the navigation bar and register the UITableViewCell class with the table view.
register(_:forCellReuseIdentifier:) guarantees your table view will return a cell of the correct type when the Cell reuseIdentifier is provided to the dequeue method.
Next, still in ViewController.swift, add the following UITableViewDataSource extension below your class definition for ViewController:
// MARK: - UITableViewDataSource
extension ViewController: UITableViewDataSource {

  func tableView(_ tableView: UITableView,
                 numberOfRowsInSection section: Int) -> Int {
    return names.count
  }

  func tableView(_ tableView: UITableView,
                 cellForRowAt indexPath: IndexPath)
                 -> UITableViewCell {

    let cell =
      tableView.dequeueReusableCell(withIdentifier: "Cell",
                                    for: indexPath)
    cell.textLabel?.text = names[indexPath.row]
    return cell
  }
}
If you’ve ever worked with UITableView, this code should look very familiar. First you return the number of rows in the table as the number of items in your names array.
Next, tableView(_:cellForRowAt:) dequeues table view cells and populates them with the corresponding string from the names array.
Next, you need a way to add new names so the table view can display them. Implement the addName IBAction method you Ctrl-dragged into your code earlier:
// Implement the addName IBAction
@IBAction func addName(_ sender: UIBarButtonItem) {

  let alert = UIAlertController(title: "New Name",
                                message: "Add a new name",
                                preferredStyle: .alert)

  let saveAction = UIAlertAction(title: "Save",
                                 style: .default) {
    [unowned self] action in

    guard let textField = alert.textFields?.first,
      let nameToSave = textField.text else {
        return
    }

    self.names.append(nameToSave)
    self.tableView.reloadData()
  }

  let cancelAction = UIAlertAction(title: "Cancel",
                                   style: .default)

  alert.addTextField()

  alert.addAction(saveAction)
  alert.addAction(cancelAction)

  present(alert, animated: true)
}
Every time you tap the Add button, this method presents a UIAlertController with a text field and two buttons, Save and Cancel.
Save inserts the text fields current text into the names array then reloads the table view. Since the names array is the model backing the table view, whatever you type into the text field will appear in the table view.
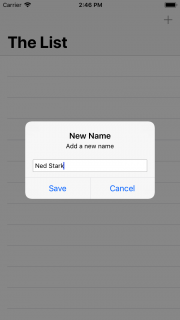
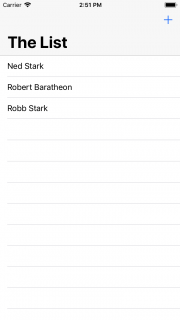
Finally, build and run your app for the first time. Next, tap the Add button. The alert controller will look like this:
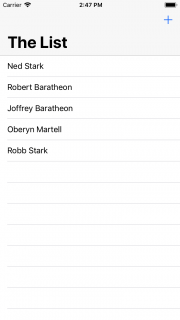
Add four or five names to the list. You should see something similar to below:
Your table view will display the data and your array will store the names, but the big thing missing here is persistence. The array is in memory but if you force quit the app or reboot your device, your hit list will be wiped out.
Core Data provides persistence, meaning it can store data in a more durable state so it can outlive an app re-launch or a device reboot.
You haven’t added any Core Data yet, so nothing should persist after you navigate away from the app. Let’s test this out. Press the Home button if you’re using a physical device or the equivalent (Shift+⌘+H) if you’re using the Simulator. This will take you back to the familiar app grid on the home screen:
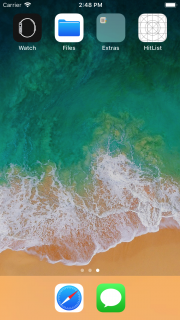
From the home screen, tap the HitList icon to bring the app back to the foreground. The names are still on the screen. What happened?
When you tap the Home button, the app currently in the foreground goes to the background. When this happens, the operating system flash-freezes everything currently in memory, including the strings in the names array. Similarly, when it’s time to wake up and return to the foreground, the operating system restores what used to be in memory as if you’d never left.
Apple introduced these advances in multitasking back in iOS 4. They create a seamless experience for iOS users but add a wrinkle to the definition of persistence for iOS developers. Are the names really persisted?
No, not really. If you had completely killed the app in the fast app switcher or turned off your phone, those names would be gone. You can verify this, as well. With the app in the foreground, double tap the Home button to enter the fast app switcher, like so:
From here, flick the HitList app snapshot upwards to terminate the app. There should be no trace of HitList in living memory (no pun intended). Verify the names are gone by returning to the home screen and tapping on the HitList icon to trigger a fresh launch.
The difference between flash-freezing and persistence may be obvious if you’ve worked with iOS for some time and are familiar with the way multitasking works. In a user’s mind, however, there is no difference. The user doesn’t care why the names are still there, whether the app went into the background and came back, or because the app saved and reloaded them.
All that matters is the names are still there when the app comes back!
So the real test of persistence, is whether your data is still there after a fresh app launch.
Modeling your Data
Now that you know how to check for persistence, you can dive into Core Data. Your goal for the HitList app is simple: persist the names you enter so they’re available for viewing after a fresh app launch.
Up to this point, you’ve been using plain old Swift strings to store the names in memory. In this section, you’ll replace these strings with Core Data objects.
The first step is to create a managed object model, which describes the way Core Data represents data on disk.
By default, Core Data uses a SQLite database as the persistent store, so you can think of the Data Model as the database schema.
NSManagedObjectContext, chances are you are dealing with a Core Data class. “Managed” refers to Core Data’s management of the life cycle of Core Data objects.
However, don’t assume all Core Data classes contain the word “managed”. Actually, most don’t. For a comprehensive list of Core Data classes, check out the Core Data framework reference in the documentation browser.
Since you’ve elected to use Core Data, Xcode automatically created a Data Model file for you and named it HitList.xcdatamodeld.
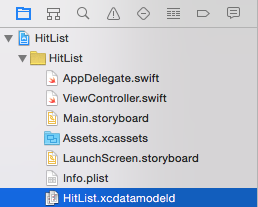
Open HitList.xcdatamodeld. As you can see, Xcode has a powerful Data Model editor:
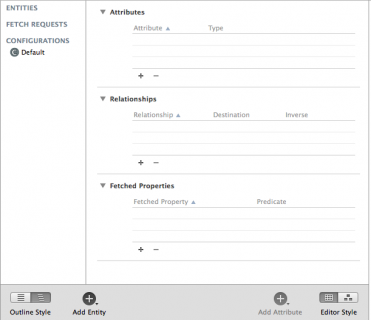
The Data Model editor has a lot of features, but for now, let’s focus on creating a single Core Data entity.
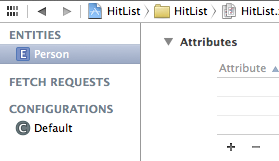
Click on Add Entity on the lower-left to create a new entity. Double-click the new entity and change its name to Person, like so:
You may be wondering why the model editor uses the term Entity. Weren’t you simply defining a new class? As you’ll see shortly, Core Data comes with its own vocabulary. Here’s a quick rundown of some terms you’ll commonly encounter:
-
An entity is a class definition in Core Data. The classic example is an
Employeeor aCompany. In a relational database, an entity corresponds to a table. -
An attribute is a piece of information attached to a particular entity. For example, an
Employeeentity could have attributes for the employee’sname,positionandsalary. In a database, an attribute corresponds to a particular field in a table. -
A relationship is a link between multiple entities. In Core Data, relationships between two entities are called to-one relationships, while those between one and many entities are called to-many relationships. For example, a
Managercan have a to-many relationship with a set of employees, whereas an individualEmployeewill usually have a to-one relationship with his manager.
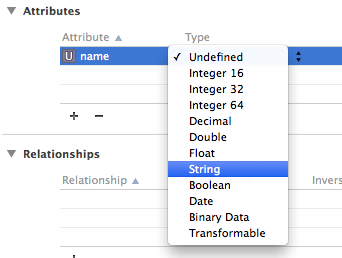
Now that you know what an attribute is, you can add an attribute to Person object created earlier. Open HitList.xcdatamodeld. Next, select Person on the left-hand side and click the plus sign (+) under Attributes.
Set the new attribute’s name to, er, name and change its type to String:
Saving to Core Data
Open ViewController.swift, add the following Core Data module import below the UIKit import:
import CoreData
This import is all you need to start using the Core Data API in your code.
Next, replace the names property definition with the following:
var people: [NSManagedObject] = []
You’ll store Person entities rather than string names, so you rename the array serving as the table view’s data model to people. It now holds instances of NSManagedObject rather than simple strings.
NSManagedObject represents a single object stored in Core Data; you must use it to create, edit, save and delete from your Core Data persistent store. As you’ll see shortly, NSManagedObject is a shape-shifter. It can take the form of any entity in your Data Model, appropriating whatever attributes and relationships you defined.
Since you’re changing the table view’s model, you must also replace both data source methods implemented earlier. Replace your UITableViewDataSource extension with the following:
// MARK: - UITableViewDataSource
extension ViewController: UITableViewDataSource {
  func tableView(_ tableView: UITableView,
                 numberOfRowsInSection section: Int) -> Int {
    return people.count
  }

  func tableView(_ tableView: UITableView,
                 cellForRowAt indexPath: IndexPath)
                 -> UITableViewCell {

    let person = people[indexPath.row]
    let cell =
      tableView.dequeueReusableCell(withIdentifier: "Cell",
                                    for: indexPath)
    cell.textLabel?.text =
      person.value(forKeyPath: "name") as? String
    return cell
  }
}
The most significant change to these methods occurs in tableView(_:cellForRowAt:). Instead of matching cells with the corresponding string in the model array, you now match cells with the corresponding NSManagedObject.
Note how you grab the name attribute from the NSManagedObject. It happens here:
cell.textLabel?.text =
  person.value(forKeyPath: "name") as? String
Why do you have to do this? As it turns out, NSManagedObject doesn’t know about the name attribute you defined in your Data Model, so there’s no way of accessing it directly with a property. The only way Core Data provides to read the value is key-value coding, commonly referred to as KVC.
NSMangedObject behave more or less like a dictionary at runtime.
Key-value coding is available to all classes inheriting from NSObject, including NSManagedObject. You can’t access properties using KVC on a Swift object that doesn’t descend from NSObject.
Next, find addName(_:) and replace the save UIAlertAction with the following:
let saveAction = UIAlertAction(title: "Save", style: .default) {
  [unowned self] action in

  guard let textField = alert.textFields?.first,
    let nameToSave = textField.text else {
      return
  }

  self.save(name: nameToSave)
  self.tableView.reloadData()
}
This takes the text in the text field and passes it over to a new method named save(name:). Xcode complains because save(name:) doesn’t exist yet. Add it below addName(_:):
func save(name: String) {

  guard let appDelegate =
    UIApplication.shared.delegate as? AppDelegate else {
    return
  }

  // 1
  let managedContext =
    appDelegate.persistentContainer.viewContext

  // 2
  let entity =
    NSEntityDescription.entity(forEntityName: "Person",
                               in: managedContext)!

  let person = NSManagedObject(entity: entity,
                               insertInto: managedContext)

  // 3
  person.setValue(name, forKeyPath: "name")

  // 4
  do {
    try managedContext.save()
    people.append(person)
  } catch let error as NSError {
    print("Could not save. \(error), \(error.userInfo)")
  }
}
This is where Core Data kicks in! Here’s what the code does:
-
Before you can save or retrieve anything from your Core Data store, you first need to get your hands on an
NSManagedObjectContext. You can consider a managed object context as an in-memory “scratchpad” for working with managed objects.Think of saving a new managed object to Core Data as a two-step process: first, you insert a new managed object into a managed object context; then, after you’re happy with your shiny new managed object, you “commit” the changes in your managed object context to save it to disk.
Xcode has already generated a managed object context as part of the new project’s template. Remember, this only happens if you check the Use Core Data checkbox at the beginning. This default managed object context lives as a property of the
NSPersistentContainerin the application delegate. To access it, you first get a reference to the app delegate. -
You create a new managed object and insert it into the managed object context. You can do this in one step with
NSManagedObject’s static method:entity(forEntityName:in:).You may be wondering what an
NSEntityDescriptionis all about. Recall earlier,NSManagedObjectwas called a shape-shifter class because it can represent any entity. An entity description is the piece linking the entity definition from your Data Model with an instance ofNSManagedObjectat runtime. -
With an
NSManagedObjectin hand, you set thenameattribute using key-value coding. You must spell the KVC key (namein this case) exactly as it appears in your Data Model, otherwise your app will crash at runtime. -
You commit your changes to
personand save to disk by callingsaveon the managed object context. Notesavecan throw an error, which is why you call it using thetrykeyword within ado-catchblock. Finally, insert the new managed object into thepeoplearray so it shows up when the table view reloads.
That’s a little more complicated than an array of strings, but not too bad. Some of the code here, such as getting the managed object context and entity, could be done just once in your own init() or viewDidLoad() then reused later. For simplicity, you’re doing it all in the same method.
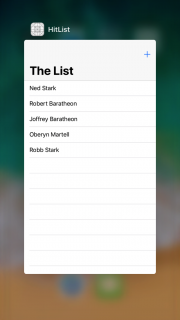
Build and run the app, and add a few names to the table view:

If the names are actually stored in Core Data, the HitList app should pass the persistence test. Double-tap the Home button to bring up the fast app switcher. Terminate the HitList app by flicking it upwards.
From Springboard, tap the HitList app to trigger a fresh launch. Wait, what happened? The table view is empty:
You saved to Core Data, but after a fresh app launch, the people array is empty! That’s because the data is sitting on disk waiting for you, but you’re not showing it yet.
Fetching from Core Data
To get data from your persistent store into the managed object context, you have to fetch it. Open ViewController.swift and add this code below viewDidLoad():
override func viewWillAppear(_ animated: Bool) {
  super.viewWillAppear(animated)

  //1
  guard let appDelegate =
    UIApplication.shared.delegate as? AppDelegate else {
      return
  }

  let managedContext =
    appDelegate.persistentContainer.viewContext

  //2
  let fetchRequest =
    NSFetchRequest<NSManagedObject>(entityName: "Person")

  //3
  do {
    people = try managedContext.fetch(fetchRequest)
  } catch let error as NSError {
    print("Could not fetch. \(error), \(error.userInfo)")
  }
}
Step by step, this is what the code does:
-
Before you can do anything with Core Data, you need a managed object context. Fetching is no different! Like before, you pull up the application delegate and grab a reference to its persistent container to get your hands on its
NSManagedObjectContext. -
As the name suggests,
NSFetchRequestis the class responsible for fetching from Core Data. Fetch requests are both powerful and flexible. You can use fetch requests to fetch a set of objects meeting the provided criteria (i.e. give me all employees living in Wisconsin and have been with the company at least three years), individual values (i.e. give me the longest name in the database) and more.Fetch requests have several qualifiers used to refine the set of results returned. You’ll learn more about these qualifiers in Chapter 4, “Intermediate Fetching”; for now, you should know
NSEntityDescriptionis a required one of these qualifiers.Setting a fetch request’s
entityproperty, or alternatively initializing it withinit(entityName:), fetches all objects of a particular entity. This is what you do here to fetch allPersonentities. Also noteNSFetchRequestis a generic type. This use of generics specifies a fetch request’s expected return type, in this caseNSManagedObject. -
You hand the fetch request over to the managed object context to do the heavy lifting.
fetch(_:)returns an array of managed objects meeting the criteria specified by the fetch request.
save(), fetch(_:) can also throw an error so you have to use it within a do block. If an error occurred during the fetch, you can inspect the error inside the catch block and respond appropriately.
Build and run the application. Immediately, you should see the list of names you added earlier:
Great! They’re back from the dead (pun intended). Add a few more names to the list and restart the app to verify saving and fetching are working. Short of deleting the app, resetting the Simulator or throwing your phone off a tall building, the names will appear in the table view no matter what.
Where to Go From Here?
You can download the completed project for this tutorial here.
In just a few pages, you’ve already experienced several fundamental Core Data concepts: Data Models, entities, attributes, managed objects, managed object contexts and fetch requests.
 If you enjoyed what you learned in this tutorial, why not check out the complete Core Data by Tutorials book, available in our store?
Here’s a taste of what’s in the book:
1. Chapter 1, Your First Core Data App: You’ll click File\New Project and write a Core Data app from scratch! This chapter covers the basics of setting up your data model and then adding and fetching records.
2. Chapter 2, NSManagedObject Subclasses: NSManagedObject is the base data storage class of your Core Data object graphs. This chapter will teach you how you customize your own managed object subclasses to store and validate data.
3. Chapter 3, The Core Data Stack: Under the hood, Core Data is made up of many parts working together. In this chapter, you’ll learn about how these parts fit together, and move away from the starter Xcode template to build your own customizable system.
4. Chapter 4, Intermediate Fetching: Your apps will fetch data all the time, and Core Data offers many options for getting the data to you efficiently. This chapter covers more advanced fetch requests, predicates, sorting and asynchronous fetching.
5. Chapter 5, NSFetchedResultsController: Table views are at the core of many iOS apps, and Apple wants to make Core Data play nicely with them! In this chapter, you’ll learn how NSFetchedResultsController can save you time and code when your table views are backed by data from Core Data.
6. Chapter 6, Versioning and Migration: As you update and enhance your app, its data model will almost certainly need to change. In this chapter, you’ll learn how to create multiple versions of your data model and then migrate your users forward so they can keep their existing data as they upgrade.
7. Chapter 7, Unit Tests: Testing is an important part of the development process, and you shouldn’t leave Core Data out of that! In this chapter, you’ll learn how to set up a separate test environment for Core Data and see examples of how to test your models.
8. Chapter 8, Measuring and Boosting Performance: No one ever complained that an app was too fast, so it’s important to be vigilant about tracking performance. In this chapter, you’ll learn how to measure your app’s performance with various Xcode tools and then pick up some tips for dealing with slow spots in your code.
9. Chapter 9, Multiple Managed Object Contexts: In this final chapter, you’ll expand the usual Core Data stack to include multiple managed object contexts. You’ll learn how this can improve perceived performance and help make your app architecture less monolithic and more compartmentalized.
And to help sweeten the deal, the digital edition of the book is on sale for $49.99! But don’t wait — this sale price is only available for a limited time.
Speaking of sweet deals, be sure to check out the great prizes we’re giving away this year with the iOS 11 Launch Party, including over $9,000 in giveaways!
To enter, simply retweet this post using the #ios11launchparty hashtag by using the button below:
We hope you enjoy this update, and stay tuned for more book releases and updates!
The post Getting Started with Core Data Tutorial appeared first on Ray Wenderlich.


